Ancient cheat — launch and setup instruction
Step-by-step guide to launching Ancient cheats: overlay setup (NVidia App/SteelSeries for most games, Medal/Discord for Apex/ARC Raiders/Delta Force), loader launch, system requirements and common error fixes (FAQ).
Overlay Setup
You need to set up an overlay before launching. NVIDIA GPUs support NVidia App and SteelSeries. AMD GPUs only support SteelSeries.
NVidia App (does not support fullscreen mode)
- Download and install NVidia App.
- Open the app settings.
- Go to the Generals section.
- Enable IN-GAME OVERLAY.
SteelSeries (supports fullscreen mode)
- Download and install SteelSeries GG.
- Go to settings, section GENERAL → General.
- Enable Sonar.
- Go to the SONAR → Shortcuts tab.
- Set Master - Volume Up bind (for example, key
F7). - Press this bind before injection.
Only for Apex Legends, ARC Raiders, Delta Force
These three games work only with the Medal or Discord overlay. Both overlays do not support fullscreen mode — run the game in Windowed or Borderless mode.
Medal
- Download and install Medal: medal.tv/download
- Create an account and sign in.
- Make sure the overlay is enabled in Medal settings.
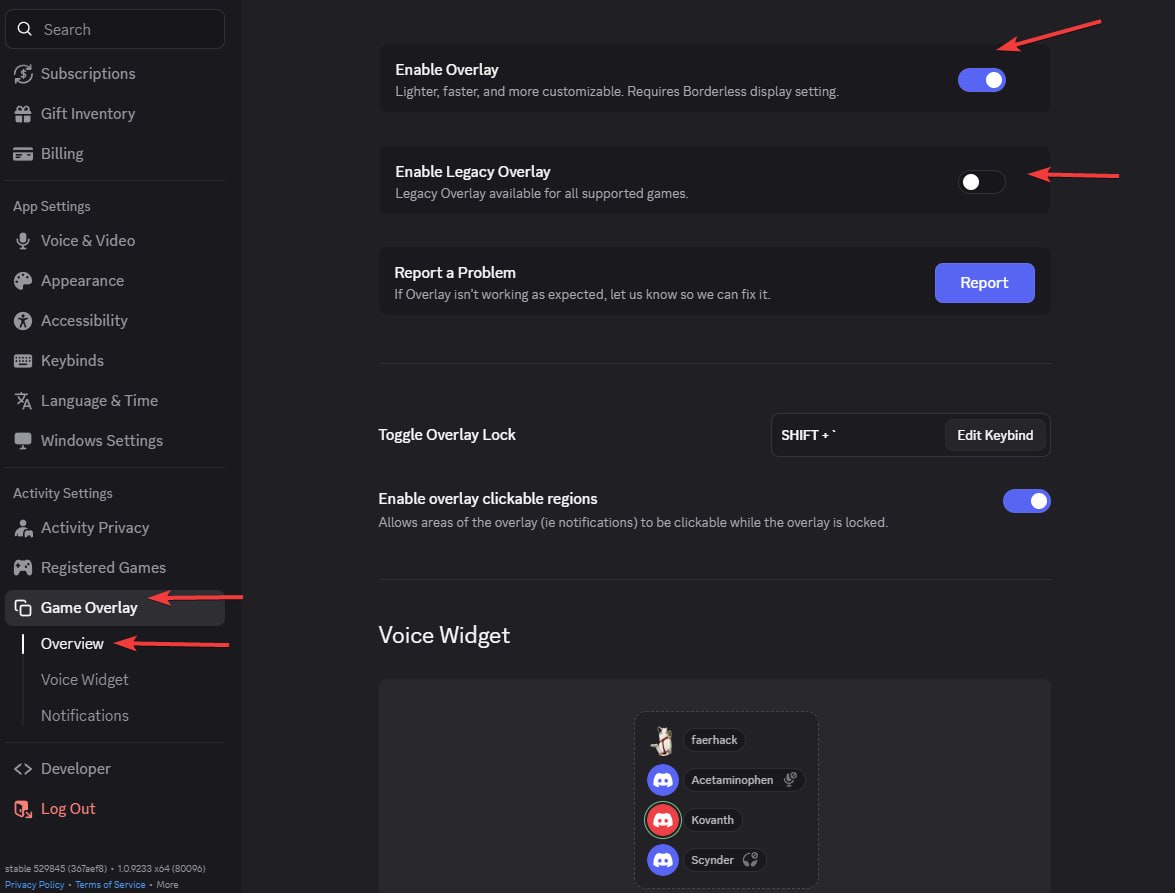
Discord
- Open Discord Settings (gear icon at the bottom left).
- Go to Game Overlay and enable the in-game overlay.
- Go to Appearance → Advanced (at the very bottom) and disable:
- Legacy Overlay
- Hardware Acceleration
- Restart Discord.
If the "Registered Games" section shows "No suitable overlay": disable and re-enable the overlay in Discord settings.
Launch
- Download the loader: undetect.net/download/loader
- Disable your antivirus (Windows Defender and others).
- Run the loader.
- Enter your activation key.
- Click "Inject".
- After injection the loader will close automatically — this means you can launch the game.
- The menu is opened with the Insert key. For Apex Legends, ARC Raiders, Delta Force the menu appears approximately 1 minute after injection.
System Requirements
- CPU: Intel + AMD (AES instruction support required)
- BIOS: SVM / VT-X must be enabled
- OS: Windows 10–11 | 1809–24H2
- RAM: 16 GB
Spoofer for Delta Force and Arena Breakout
The spoofer works only under the following conditions:
- Windows reinstall with a new user (with all disk partitions deleted).
- Game reinstall.
- VPN with a clean IP (not a server IP like Aeza).
- From the first login to the account, the game loader must be opened already with VPN on.
FAQ — Frequently Asked Questions
Menu does not appear after injection (Apex, ARC Raiders, Delta Force)
Solution: For these games the menu appears approximately 1 minute after injection — please wait. If after 2–3 minutes the menu still does not open with the Insert key, make sure Medal or Discord is set up and running, then reinject.
Discord: "No suitable overlay" message
Solution: Disable and re-enable the overlay in Discord settings → Game Overlay.
Medal does not launch / cannot be downloaded (Russia)
Solution: The service is blocked in Russia. Enable VPN and try again.
Error: Please launch SteelSeries moment overlay (FOR GEFORCE)
Solution: Disable and re-enable the GeForce overlay.
Error: Please launch SteelSeries Sonar overlay (FOR STEELSERIES)
Solution: Press the SONAR bind before launching so the overlay works.
Menu flickering or black screens in the game
Solution for SteelSeries: Open SteelSeries → Settings → MOMENTS → Capture and Sound → disable "ALLOW MOMENTS TO CAPTURE WHILE GAMING".
Solution for Medal/Discord: Run the game in Windowed or Borderless mode — these overlays do not support fullscreen.
Error: Please disable Intel Rapid Storage Technology
Solution: Disable RST. How to disable it.
Error: The bind button does not work
Solution: Reinject. If it does not help — run the overlay as administrator.
The loader closes immediately after starting
Solution: Install the library: vc_redist.x64.exe
Error: Unsupported Firmware
Solution: Convert the disk to GPT, switch BIOS from Legacy to UEFI.
Error: 0x296
Solution: Reinject is needed.
Error: Unknown network error
Solution: Internet connection issue. Check your connection and try again. You may be using a VPN — try disabling it.
Error: Failed to allocate memory / to map memory(x)
Solution: The driver was installed incorrectly. Restart the PC and try again. If the error persists — clean up autostart programs. We recommend Autoruns to disable third-party programs from autostart.
Error: Failed to load dependencies(x)(-x)
Solution: Disable all protection and remove all anti-cheats and antiviruses from the PC. If that does not help — clean up autostart programs.
Error: Please uninstall Vanguard/Faceit first
Solution: Uninstall the Vanguard/Faceit anti-cheat from your PC and try again.
Error: AES instruction set is not supported
Solution: The CPU does not support AES instructions. This cannot be fixed.
Error: Please enable Intel VT-X/AMD-V in the BIOS
Solution: Enter the BIOS and find "Intel Virtualization Technology" / "Intel VT-X" / "AMD-V" / "SVM Mode" — enable this option.
Error: VMX/SVM is not supported
Solution: Go to "Control Panel" → "Programs and Features" → "Turn Windows features on or off" and make sure "Virtual Machine Platform" and "Hyper-V" are disabled.
If the error persists, open cmd as administrator and enter:
bcdedit /set hypervisorlaunchtype off
Press Enter and reboot the computer.
If you have Windows 11 and the above did not help, run PowerShell as administrator and execute:
takeown /F "C:\Windows\System32\hvix64.exe"
icacls "C:\Windows\System32\hvix64.exe" /grant *$(([System.Security.Principal.WindowsIdentity]::GetCurrent()).User.Value):F
takeown /F "C:\Windows\System32\hvax64.exe"
icacls "C:\Windows\System32\hvax64.exe" /grant *$(([System.Security.Principal.WindowsIdentity]::GetCurrent()).User.Value):F
del "C:\Windows\System32\hvix64.exe"
del "C:\Windows\System32\hvax64.exe"
Error: Please make sure PIN is not set in Windows sign-in options and manually disable Hyper-V
Detailed solution: How to fix the PIN and Hyper-V error
Step 1. Disable the Windows sign-in PIN
This is the mandatory first step.
- Open Windows Settings (Win + I).
- Go to: Accounts → Sign-in options.
- Make sure the PIN (Windows Hello) is fully disabled. If enabled — remove the PIN.
- Reboot the computer.
Step 2. Run PowerShell as administrator
- Press Win + X.
- Select Windows PowerShell (Admin) or Terminal (Admin).
Step 3. Take ownership of the system files and delete them
Enter the commands strictly in order:
takeown /F "C:\Windows\System32\hvix64.exe"
icacls "C:\Windows\System32\hvix64.exe" /grant *$(([System.Security.Principal.WindowsIdentity]::GetCurrent()).User.Value):F
takeown /F "C:\Windows\System32\hvax64.exe"
icacls "C:\Windows\System32\hvax64.exe" /grant *$(([System.Security.Principal.WindowsIdentity]::GetCurrent()).User.Value):F
del "C:\Windows\System32\hvix64.exe"
del "C:\Windows\System32\hvax64.exe"
Step 4. If the files cannot be deleted
The files may be locked by the system. In that case:
- Enter the BIOS.
- Disable virtualization: Intel —
Intel Virtualization Technology (VT-x), AMD —SVM Mode. - Save the settings (Save & Exit) and boot into Windows.
- Repeat steps 2–3 (PowerShell + file deletion).
Step 5. Final
After successfully deleting the files:
- Reboot the computer.
- Make sure the system boots without errors and sign-in is performed without the PIN.
- If you previously disabled virtualization in BIOS — re-enable it.
Error: Either virtual or RAID disk is present
Solution: Disable the spoofer or disable RAID in BIOS settings with a full Windows reinstall.
Error: CRD failed at XXX with code XXXXXXXX / Failed to init render
Solution: On desktops — the GPU is old and not supported. On laptops — disable the integrated GPU in BIOS.
Error: Incorrect HWID
Solution: Open cmd as administrator and enter one by one:
wmic diskdrive get Caption, SerialNumber
wmic baseboard get SerialNumber
If both commands run without errors, something is wrong with the PC. Try reinstalling Windows.